Category: Angular

  • How to organize large angular project structure to scale and maintain

    How to organize large angular project structure to scale and maintain

    When working on Angular projects, following best practices for project organization, code structure, and architecture is crucial for maintaining scalability, readability, and maintainability. In this article, we will explore a set of best practices that can help you streamline your Angular projects and ensure a successful development process.

    Best project structure bellow for any generic project

    ∇ app
        ∇ core
             ∇ guards
                  auth.guard.ts
                  module-import.guard.ts
                  no-auth.guard.ts
             ∇ interceptor
                  token.interceptor.ts
                  error.interceptor.ts
             ∇ services
                  service-a.service.ts
                  service-b.service.ts
             ∇ components
                  ∇ navbar
                        navbar.component.html|scss|ts
                  ∇ page-not-found
                        page-not-found.component.html|scss|ts
             ∇ constants
                  constant-a.ts
                  constant-b.ts
             ∇ enums
                  enum-a.ts
                  enum-b.ts
             ∇ models
                  model-a.ts
                  model-b.ts
             ∇ utils
                  common-functions.ts
        ∇ features
             ∇ feature-a
                  ∇ components
                        ∇ scoped-shared-component-a
                                scoped-shared-component-a.component.html|scss|ts
                        ∇ scope-shared-component-b
                                scoped-shared-component-b.component.html|scss|ts
                  ∇ pages
                       ∇ page-a
                            page-a.component.html|scss|ts
                       ∇ page-b
                            page-b.component.html|scss|ts
                  ∇ models
                        scoped-model-a.model.ts
                        scoped-model-b.model.ts
                  ∇ services
                        scoped-service-a.service.ts
                        scoped-service-b.service.ts
                  feature-a-routing.module.ts
                  feature-a.module.ts
                  feature-a.component.html|scss|ts
        ∇ shared
             ∇ components
                  ∇ shared-button
                       shared-button.component.html|scss|ts
             ∇ directives
                  shared-directive.ts
             ∇ pipes
                  shared-pipe.ts
             shared.module.ts
        styles.scss
        ▽ styles
            app-loading.scss
            company-colors.scss
            spinners.scss
            variables.scss
        ▽ assets
            ▽ i18n
                lang-a.json
                lang-b.json
            ▽ images
                image-a.svg
                image-b.svg
            ▽ static
                structure-a.json
                structure-b.json
            ▽ icons
                custom-icon-a.svg
                custom-icon-b.svg

    Structure explanation

    1. Project Structure

    A well-organized project structure is the foundation of a successful Angular application. Consider adopting the following structure:

    • src: All application code goes here.
      • app: The root module and core application components.
        • core: Singleton services, interceptors, guards, enums, constants, and utilities.
        • shared: SharedModule containing reusable components, directives, and pipes.
        • features: Feature modules, each representing a distinct application feature.
      • assets: Media files, fonts, and other static assets.
      • styles: Global styles and mixins for consistent theming.
      • environments: Configuration settings for different environments.

    2. App Module

    The root AppModule should be kept lean and focused. It’s the entry point of the application and should be responsible for bootstrapping the app and importing necessary modules. Avoid cluttering it with too many declarations.

    3. Core Module

    The CoreModule serves as the central module for root-scoped services, static components, and other singletons. It should only be loaded once at runtime and should not be lazily loaded. Use a module-import-guard to prevent re-importing it.

    4. Shared Module

    The SharedModule is responsible for housing reusable components, directives, and pipes. It should not have dependencies on other modules in the application and can significantly aid in reducing bundle size when using lazy loading.

    Standalone Component

    From angular 14 new feature introduced in angular where we don’t need to create a share module to reuse the components Read more on standalone component

    Standalone component

    5. Feature Modules

    Feature modules encapsulate specific functionality of your application. Each feature module should be in its own folder and should depend on the SharedModule for reusability. Consider lazy loading feature modules to improve application performance.

    6. Lazy Loading

    Lazy loading modules can significantly improve the initial load time of your application. Use lazy loading for feature modules that aren’t required immediately on application startup.

    7. Styles and Theming

    Organize your styles into separate files based on their functionality. Use mixins and CSS functions to encapsulate styles. Consider theming your application for a consistent and appealing user experience.

    8. State Management

    Choose an appropriate state management solution based on the complexity of your application. Options include NgRx, RxJS, and other third-party libraries. Follow established patterns like Flux or Redux for better state management. Must to read about state management here.

    9. Testing

    Write comprehensive unit tests and end-to-end tests using tools like Jasmine, Karma, and Protractor. Adopt test-driven development (TDD) practices to ensure code quality and prevent regressions.

    10. Documentation

    Maintain clear and concise documentation for your Angular project. Use tools like Compodoc to generate comprehensive documentation for your components, modules, and services.

    Conclusion

    By adhering to these best practices, you can create well-structured, maintainable, and scalable Angular projects. Keep in mind that every project is unique, so feel free to adapt these practices to suit your specific needs. Following these guidelines will contribute to a smoother development process and a successful Angular application.

    Remember, it’s important to write an original article that reflects your own insights and experiences. If you have any questions or need assistance with specific sections, feel free to ask!

  • Understanding power of Standalone component and How to use the standalone component in Angular

    Understanding power of Standalone component and How to use the standalone component in Angular

    Angular 14 brings a remarkable new feature known as “Standalone Components” that revolutionizes the way developers build and reuse components within their applications. These standalone components are independent of any Angular module, offering a seamless way to create modular and reusable UI elements. In this blog, we’ll explore the concept of standalone components and how they can be utilized to pass dynamic values and achieve diverse outcomes with ease.

    Understanding Standalone Components

    Traditionally, Angular components are part of modules defined using the @NgModule decorator. These components can be used within the same module or other modules by importing the respective module. However, standalone components break free from this constraint. They can be created with the help of the Angular CLI’s --standalone flag, which generates components that are not bound to any specific module.

    Creating a Standalone Component

    To create a standalone component, let’s say a component named MyComponent, you can use the following Angular CLI command:

    ng g c my-component --standalone
    

    Upon generating the component, the @Component decorator in the generated my-component.ts file will have a new property standalone: true to indicate that it is a standalone component.

    import { Component } from '@angular/core';
    import { CommonModule } from '@angular/common';
    import { FormsModule } from '@angular/forms';
    
    @Component({
      selector: 'app-my-component',
      template: `<p>My standalone component</p>`,
      imports: [CommonModule, FormsModule],
      standalone: true
    })
    export class MyComponent {}
    

    Utilizing Standalone Components

    Once you have a standalone component created, you can use it anywhere within your Angular project. To do so, simply import the standalone component into the file where you want to use it and include its selector in your template. The standalone component acts just like any other Angular component, offering seamless integration and reusability.

    Input Decorator for Dynamic Values

    One of the most significant advantages of standalone components is the ability to pass dynamic values through the use of input decorators. In the given example below, the app-my-component selector has three input properties: title, visible, and color.

    <app-my-component [title]="appTitle" [visible]="true" [color]="app-status"></app-my-component>
    

    The input decorator @Input() in the standalone component’s class allows you to bind these properties and receive data from its parent component.

    import { Component, Input } from '@angular/core';
    
    @Component({
      selector: 'app-my-component',
      template: `<p>My standalone component</p>`,
    })
    export class MyComponent {
      @Input() title: string;
      @Input() visible: boolean;
      @Input() color: string;
    }
    

    By leveraging input properties, you can dynamically pass data from any parent component and influence the behavior and appearance of the standalone component accordingly.

    Conclusion

    Angular 14’s standalone components offer a groundbreaking approach to building modular and reusable UI elements. By creating components that are not bound to specific modules, developers can simplify development processes and enhance code reusability. Furthermore, the input decorator enables dynamic data binding, allowing for versatile and flexible component behaviors.

    Whether you are building large-scale applications or smaller projects, standalone components prove to be a valuable tool in your Angular development arsenal. Embrace this feature to create cleaner, more maintainable, and efficient code while delivering outstanding user experiences. Happy coding!

  • Simplifying State Management in Angular with Signals and LocalStorage

    Simplifying State Management in Angular with Signals and LocalStorage

    State management is a crucial aspect of building robust and scalable web applications. It involves handling and synchronizing the application’s state across various components. Angular, being a popular front-end framework, offers several ways to manage state, such as using services, observables, and third-party libraries like NgRx. In this blog, we’ll explore a simple yet effective approach to state management using Angular services, signals, and LocalStorage.

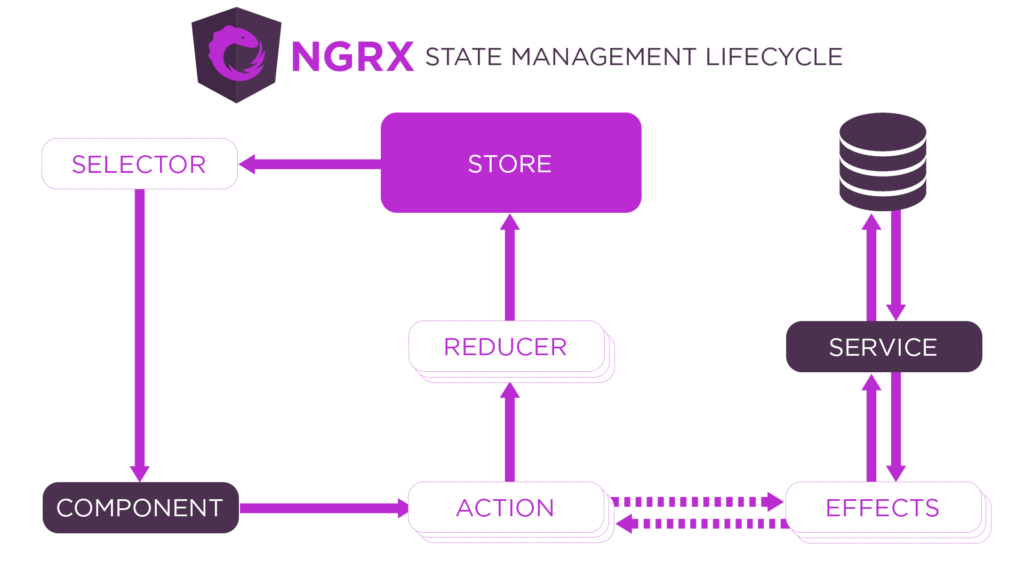
    Bellow is example of state management using NgRx

    Understanding the Approach of state management using Signals

    In this state management approach, we’ll use two service files: app-state.service.ts and signal.service.ts. The AppStateService will be responsible for managing and retrieving application states, while the SignalService will handle the signaling mechanism between components. The states will be stored both in memory and in the browser’s LocalStorage.

    Let’s dive into the code and understand each part step by step.

    The SignalService (signal.service.ts)

    The SignalService is responsible for managing signals that can notify subscribers whenever there is a change in a particular state. It uses RxJS’s Subject and BehaviorSubject to accomplish this.

    // signal.service.ts
    
    import { Injectable } from '@angular/core';
    import { BehaviorSubject, Subject } from 'rxjs';
    
    @Injectable({
      providedIn: 'root'
    })
    export class SignalService {
      private signals: { [key: string]: Subject<any> } = {};
    
      // Dispatch a signal to notify subscribers of a state change
      dispatchSignal(signalName: string, data?: any) {
        if (this.signals[signalName]) {
          this.signals[signalName].next(data);
        }
      }
    
      // Update the value of a signal (or create a new one if not exists)
      updateSignalValue(key: string, newValue: string): void {
        const signal = this.signals[key];
        if (!signal) {
          this.signals[key] = new BehaviorSubject<string>(newValue);
        } else {
          signal.next(newValue);
        }
      }
    
      // Subscribe to a signal to receive state change notifications
      subscribeToSignal(signalName: string): Subject<any> {
        let signal = this.signals[signalName];
        if (!signal) {
          signal = new Subject<any>();
          this.signals[signalName] = signal;
        }
        return signal;
      }
    }
    

    The AppStateService (app-state.service.ts)

    The AppStateService is responsible for managing application states and interacting with the SignalService for state change notifications. It also uses LocalStorage to persist the states, ensuring the state is retained even if the user refreshes the page or navigates away.

    // app-state.service.ts
    
    import { Injectable } from '@angular/core';
    import { SignalService } from './signal.service';
    import { Observable, of } from 'rxjs';
    
    @Injectable({
      providedIn: 'root'
    })
    export class AppStateService {
      private states: { [key: string]: any } = {};
    
      constructor(private signalService: SignalService) {
        this.loadStatesFromLocalStorage();
      }
    
      // Load states from LocalStorage during service initialization
      private loadStatesFromLocalStorage() {
        const savedStates = localStorage.getItem('appStates');
        if (savedStates) {
          this.states = JSON.parse(savedStates);
          for (const key in this.states) {
            if (this.states.hasOwnProperty(key)) {
              const value = this.states[key];
              this.signalService.updateSignalValue(key, value); 
            }
          } 
        }
      }
    
      // Get the state with a given key from the SignalService or LocalStorage
      getState(key: string): Observable<string> {
        const fromSignal = this.signalService.subscribeToSignal(key);
        const fromLocal = localStorage.getItem(key);
    
        return fromSignal || of(fromLocal || '');
      }
    
      // Set the state with a given key and value
      setState<T>(key: string, newState: T) {
        this.states[key] = newState;
        this.saveStatesToLocalStorage();
        this.signalService.dispatchSignal(key, newState);
      }
    
      // Save the current states to LocalStorage
      private saveStatesToLocalStorage() {
        localStorage.setItem('appStates', JSON.stringify(this.states));
      }
    }
    

    Putting It All Together

    With these two services in place, you can now manage your application states efficiently. Let’s see how you can use them in your components:

    1: Inject the AppStateService in your components.

    import { Component, OnInit } from '@angular/core';
    import { AppStateService } from './app-state.service';
    
    @Component({
      selector: 'app-your-component',
      templateUrl: './your-component.component.html',
      styleUrls: ['./your-component.component.css']
    })
    export class YourComponent implements OnInit {
      stateValue: string;
    
      constructor(private appStateService: AppStateService) { }
    
      ngOnInit() {
        // Subscribe to the state with key 'yourStateKey'
        this.appStateService.getState('yourStateKey').subscribe((value) => {
          this.stateValue = value;
        });
      }
    
      // Update the state with key 'yourStateKey' when needed
      updateState() {
        const newValue = 'New State Value';
        this.appStateService.setState('yourStateKey', newValue);
      }
    }
    

    By using this approach, you have a centralized way to manage your application states, and the components can interact with the states without direct coupling. Any change to the state triggers notifications to all subscribed components, ensuring data consistency throughout your application.

    Conclusion

    In this blog, we explored a simple and effective approach to state management in Angular using services, signals, and LocalStorage. By adopting this approach, you can maintain a clear separation of concerns and ensure a more organized and scalable codebase. Additionally, the use of LocalStorage allows the application to persist states across page reloads, enhancing the user experience.

    Remember that this is just one of many state management solutions in Angular, and the best approach depends on the complexity and specific requirements of your application. However, the combination of services, signals, and LocalStorage offers a great starting point for many projects. Happy coding!

  • State Management in Angular using Ngrx

    State Management in Angular using Ngrx

    In Angular, we use state management libraries like ngrx to handle complex data flows in large applications. ngrx is a reactive state management library based on the Redux pattern, which provides a way to manage state changes in Angular applications. It uses Observables, Actions, Reducers, and Effects to manage state changes.

    In this blog, we will discuss the steps to use ngrx in an Angular application and understand its flow.
    Step 1: Install ngrx

    First, we need to install ngrx using the npm package manager.

    npm install @ngrx/store --save

    Step 2: Define the state

    The state is the data that we want to manage in the application. We define the state using an interface in a separate file. For example, we can define a state interface for a counter application as follows:

    typescript
    export interface CounterState {
    count: number;
    }

    Step 3: Define the actions

    Actions describe the changes that occur in the application. We define actions using an enum in a separate file. For example, we can define actions for a counter application as follows:

    typescript
    import { createAction } from ‘@ngrx/store’;

    export enum CounterActionTypes {
    Increment = ‘[Counter] Increment’,
    Decrement = ‘[Counter] Decrement’,
    }

    export const increment = createAction(
    CounterActionTypes.Increment
    );

    export const decrement = createAction(
    CounterActionTypes.Decrement
    );

    Step 4: Define the reducers

    Reducers specify how the application state changes in response to actions. We define reducers in a separate file. For example, we can define reducers for a counter application as follows:

    typescript
    import { createReducer, on } from ‘@ngrx/store’;
    import { CounterActionTypes } from ‘./counter.actions’;
    import { CounterState } from ‘./counter.state’;

    export const initialState: CounterState = {
    count: 0,
    };

    export const counterReducer = createReducer(
    initialState,
    on(CounterActionTypes.Increment, (state) => ({
    count: state.count + 1,
    })),
    on(CounterActionTypes.Decrement, (state) => ({
    count: state.count – 1,
    }))
    );

    Step 5: Define the effects

    Effects are used for handling asynchronous operations, such as HTTP requests. We define effects in a separate file. For example, we can define effects for a counter application as follows:

    typescript
    import { Injectable } from ‘@angular/core’;
    import { Actions, createEffect, ofType } from ‘@ngrx/effects’;
    import { Observable, of } from ‘rxjs’;
    import { map, catchError, mergeMap } from ‘rxjs/operators’;
    import { CounterActionTypes, increment } from ‘./counter.actions’;

    @Injectable()
    export class CounterEffects {
    increment$ = createEffect(() =>
    this.actions$.pipe(
    ofType(CounterActionTypes.Increment),
    mergeMap(() =>
    this.myService.increment().pipe(
    map(() => increment()),
    catchError(() => of({ type: ‘API Error’ }))
    )
    )
    )
    );

    constructor(private actions$: Actions, private myService: MyService) {}
    }

    Step 6: Register the state, actions, reducers, and effects

    We register the state, actions, reducers, and effects in the app.module.ts file as follows:

    typescript
    import { NgModule } from ‘@angular/core’;
    import { BrowserModule } from ‘@angular/platform-browser’;
    import { AppComponent } from ‘./app.component’;
    import { StoreModule } from ‘@ngrx/store’;
    import { EffectsModule } from ‘@ngrx/effects’;
    import { counterReducer } from ‘./counter.reducer’;
    import { CounterEffects } from ‘./counter.effects’;

    @NgModule({
      declarations: [AppComponent],
      imports:
  • What is NgRx and how it works in angular background

    What is NgRx and how it works in angular background

    In Angular, we use state management libraries like ngrx to handle complex data flows in large applications. ngrx is a reactive state management library based on the Redux pattern, which provides a way to manage state changes in Angular applications. It uses Observables, Actions, Reducers, and Effects to manage state changes.

    In this blog, we will discuss the steps to use ngrx in an Angular application and understand its flow.

    What is NgRx?

    NgRx is a library that provides a way to manage the state of an Angular application in a predictable and scalable way. It is based on the Redux pattern, which is a state management library for JavaScript applications. NgRx provides a set of APIs that allow you to store and retrieve data in a central location called the store. The store is a single source of truth for the application state.

    How NgRx works in background

    NgRx is based on the Redux pattern, which consists of three main components: the store, actions, and reducers.

    Store

    The store is a centralized data store that holds the entire state of the application. It is a read-only data store, and it can only be modified by dispatching actions.

    Actions

    Actions are plain JavaScript objects that represent an event that occurred in the application. An action can be dispatched to the store to update the state. Actions have a type property that identifies the type of action being dispatched and a payload property that contains data associated with the action.

    Reducers

    Reducers are pure functions that receive the current state of the application and an action and return a new state. Reducers are responsible for updating the store with new data based on the actions that are dispatched.

    The flow of NgRx consists of the following steps:

    Dispatch an action

    To update the state of the application, an action needs to be dispatched to the store. An action is a plain JavaScript object that has a type property and an optional payload property.

    Reducers handle the action

    When an action is dispatched, it is passed to the reducers. The reducers are responsible for updating the store based on the action that was dispatched.

    Update the store

    The reducers create a new state based on the current state of the application and the action that was dispatched. The new state is then stored in the store.

    Selectors retrieve data

    To retrieve data from the store, selectors are used. Selectors are functions that take the current state of the application and return a subset of the state.

    Components subscribe to selectors

    Components can subscribe to selectors to get notified when the state of the application changes. When the state changes, the selector returns a new value, and the component is updated with the new data.

    How to implement NgRx into angular code

    Conclusion

    In this blog, we explored how to use NgRx in Angular, how it works in the background, and its flow. NgRx is a powerful state management library that helps in handling complex data flows and managing state in a predictable way. With NgRx, you can store and retrieve data in a central location called the store, and update the store by dispatching actions. Reducers are responsible for updating the store based on the actions that are dispatched, and selectors are used to retrieve data from the store. Components can subscribe to selectors to get notified when the state of the application changes.